
As I progress in my woodworking skills, my interests are persistently moving me toward more frequent hand tool usage. I will never give up my machines (with the exception of the table saw) because they perform the bulk of the preliminary work, milling lumber to S6S.
In the coming months I will be building a Nicholson Bench and I plan on cutting all the joinery by hand. Since the bench will be made entirely from home center 2 x 12 construction grade lumber, I will need a spot to break the material down into manageable sizes prior to milling at the Bandsaw (rip to width), jointer (flat face and square edge), planer (parallel face), and finally, the table saw (parallel edge). Enter the saw bench. This bench will support the boards as I cross cut and rip them to rough length and width, respectively.
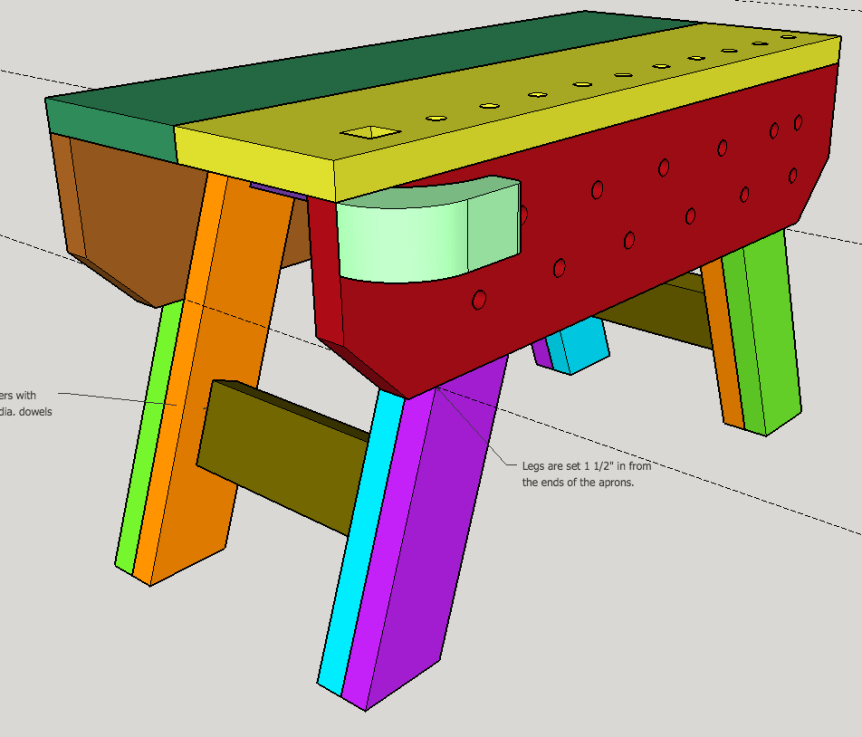
There are a few different styles of saw benches to choose from but mine was inspired from Billy’s Little Bench. Upon further inspection of Billy’s construction I saw that he made the tails on the two top pieces. I don’t know the reasoning for that orientation of the dovetail joint but I made mine with the pins on the top pieces instead. In my thought process I will be moving this bench by lifting the top so I want the pins to pull and wedge between the tails as not to pull the joint apart. In any case, I don’t foresee any issues down the road with this joint orientation.


I have detailed plans available. Keep in mind the height for your bench, if you choose to build one, should be at your knee height. I am 5’9″ so the height of my saw bench is just over 18″. This allows me to pin the workpiece between one knee as I kneel on it and with one leg and lean into it with the other during a crosscut.
This saw bench is made entirely from one 10′ length of 2×12 material and two 8′ lengths of 2×4 material, though a single 16′ 2×12 would probably be sufficient for this saw bench with a little material left over.
The material list is as follows:
Feet: (2) 3″ x 3″ x 17″ (laminated from 2×4 stock)
Uprights: (4) 1.25″ x 5″ x Overall height you need* (height – foot width + tenon length)
Top: (2) 1.25″ x 5″ x 32″
Lower Stretchers: (2) 1.25″ x 2″ x 32″
Aprons: (2) 1.25″ x 3″ x 32″
*Mine was 18″ high so my uprights were 17″ as my tenons were 2″ long (18 – 3 + 2) = 17
The video below is intended to be an over view of how I made my bench. Billy does a fine job showing how he made his so I will not reinvent the wheel…just my own bench. Enjoy!
Coming up…a build of this Kids Nicholson Bench. It could be used as a workbench or converted into a bench to sit on when a child out grows it.

Fun video. I’ve seen similar benches and may just add this to my list for a project. Thanks
Thanks, yes, I got the inspiration from billyslittlebench.com. The joinery on mine, the dovetail portion, is reversed of his. I felt I was goi g to be lifting mi e by the top hense the tails on the legs.
Hi, I liked the post and built a copy of the bench and have a second part built. I have modified the design of the second bench to be shorter so it can live under the overhang of my bench where it will be available but clumsy boy won’t fall over it. I have also put the tails back on the top as this better opposes the forces in use. The tails in the end are working adequately in my existing bench but can be knocked out of square, putting the tails on the top surface will prevent this and as long as they are tight won’t be compromised by lifting the bench by the top.
Didn’t see a link to downloadable plans but noted that the link to Billys Little Bench is broken.
Thanks for letting me know, I’ll fix it. The link to the plans are in the sidebar.
Thanks for letting me know (and quickly). I see that I failed to scroll down far enough.