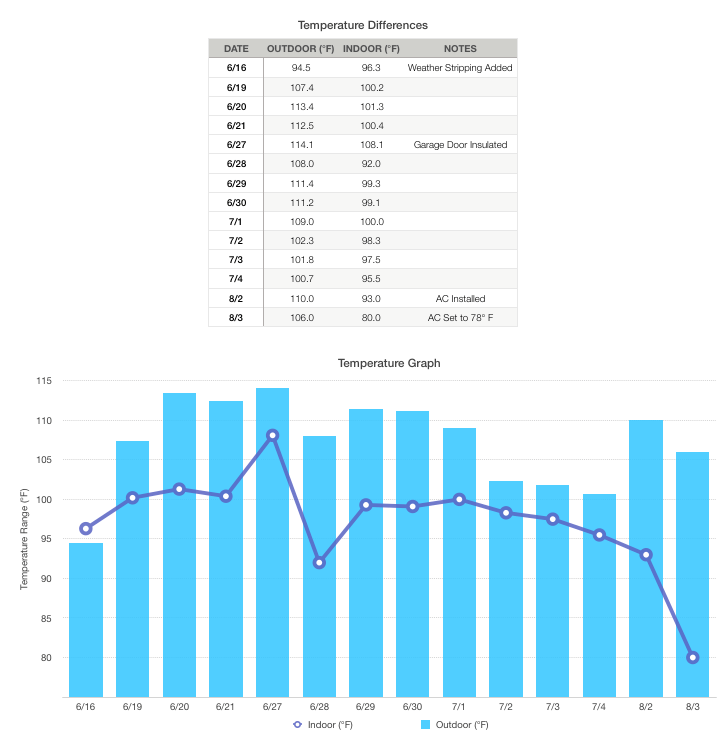
With the garage door insulated I noticed a decent temperature reduction and stabilization throughout the day. Typically, the shop would reach 101-103 degrees at 4pm when the sun was in full force. With the door insulated the shop was now about 10-12 degrees cooler at that same time of day. Still hot inside but 92 degrees is better than 103 degrees.
Here is a chart of indoor and outdoor temps I tracked for a couple of weeks after sealing and insulating the garage door and then installing the AC. Aside from looking like a penguin lying on it’s back, it helps to show what steps can be taken to most economically reduce the temperature inside your shop. Not everyone has the luxury of shop AC but weather stripping, insulating the bay door(s), and attic space insulation and an attic fan can significantly help balance the indoor temperature.
Now lets install the AC. I installed an 18,000 BTU 17.7 SEER 240V Pioneer Mini Split. It starts by clearing a space to work locating studs and hanging the indoor unit’s bracket. The screws provided were so wimpy that I replaced them with longer, 2″, self-tapping screws for added security. The indoor unit isn’t that heavy to begin with but I would prefer 1.5″ of holding power in a stud vs 5/8″.


With the mounting bracket installed I then chose the location for the outdoor condenser. It am placing it directly on the opposite side of the wall so there is no need to run long lines. I made the form, placed some rebar in the middle of the form, then mixed and poured the concrete. Once the form was filled, I used a 2×4 on edge to screed it and then troweled it smooth. The concrete was left to cure for a few days according to the manufacturer’s suggestions.


Wiring the indoor fan for power was an interesting process, which I’ll address in a moment. First you have to flip the unit over and remove the back corner panel for access to run the wire. Then flip it back over and open the front cover to access the electrical connections.


Run the wire through the opening to bring the wire to the connection bar. This particular unit was different than others I had seen as they labeled the wires 1, 2, 3 and the instructions made no mention of which was which. I just looked at the corresponding wires on the other end and attached them accordingly. Now wiring the unit was interesting because the U-lugs didn’t fit into the connections. I ended up cutting the connectors off, twisted the wires, inserted them, and clamped them in place. Now we are ready to proceed.


The hole was drilled in the wall, the lines were connected to the indoor unit, and they were run through the wall. The hole to be drilled for this unit is 2.5″ in diameter and should be drilled at a slight downward angle. It is best practice to drill through the wall and when the pilot bit passes through the siding on the outside then you drill from the outside to have a clean hole. Once the hole was drilled the hole in the attic eave is located for the power line. When that was being drilled I went into the attic and fished the line through the hole for the installer to save time. Now here is the difference between doing something yourself and hiring someone to do it for you: Quality of work. In an effort to not micromanage an AC installer I left him to do the work as he normally would. Big mistake. After he drilled the hole (no problem), connected the lines to the indoor unit (no problem), he then pushed all the lines through the wall and hung the unit. He didn’t bother using the plastic sleeve and bushing to line the hole and seal the insulation from the lines. It was partially my mistake not to notice this until the installer had hooked everything up and was about to cover the lines with a sheet metal cover. When I mentioned it he said “well, it’s too late now. I would have to unhook everything to fix that.” What an idiot. Both him (because he was) and me (for not noticing earlier). So I just filled the hole with spray foam insulation and hoped that would be ok.


The final step was to connect the copper lines and wire the outdoor unit for power. The copper lines need to be connected with a flaring tool. This is the main reason I had an AC installer come out to do the hook up for me. Once the lines were connected the installer then used a vacuum pump and nitrogen to pressurize and test for leaks (the second reason for an installer).


With everything working it was time to turn the power on and start up the unit. From the chart at the beginning of this entry you can see the temperature difference in the shop to the outside. It has been a pleasure to be in the shop on the hot days not only to work but to get out of the heat and cool down in my castle.
